Workflow Editor in Angular (part 2)
Received enough claps (actually a single one) for the first part so it seems like I have to reveal more secrets of Workflow Editor creation. Please start with the first part if you missed that.
At RequestLogic we have a simple workflow editor where you cannot create loops only sequential events and branching with simple if statements.

There are 3 types of nodes in RequestLogic: Email Sending, State Change, and Condition. The first two are single-step processes, the Condition node can branch out based on different conditions. Currently, the latest sent mail status can be observed whether in bounced, opened, clicked, or unsubscribed state.
Every node can have a before- and an after-delay to get rid of the need for Delay nodes.
The nodes follow each other in sequential order and only the condition node can shake it up a bit.
This time I would like to create or at least write about creating a more general workflow editor that allows you to connect any of the nodes and let you process tasks in parallel.
Make it complex
If you followed the first part (the link is here if you not just skipped the first part but the first part of this article as well) you already should have a static editor that can be modified by changing the way you create your nodes in the nodes array.
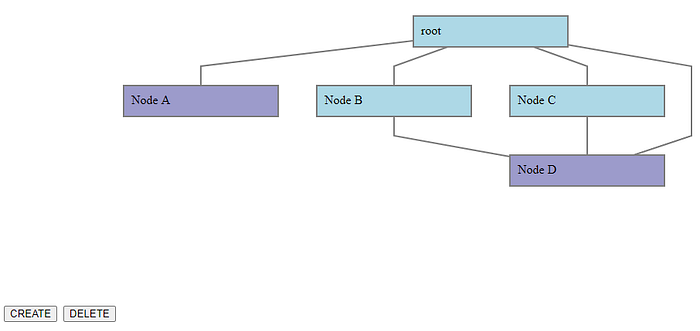
Let change our Node class to enable complex cobweb structure.
export class Node {
  constructor(
    public id: string,
    public relationIds: string[] = []
  ) {
  }
}var nodes = [];
nodes.push(new Node("root"));
nodes.push(new Node("Node A", ["root"]));
nodes.push(new Node("Node B", ["root"]));
nodes.push(new Node("Node C", ["root"]));
nodes.push(new Node("Node D", ["Node B", "Node C", "root"]));
We have to change the way we feed the edges to Dagre like this:
nodes.forEach(node => {
  g.setNode(node.id, { width: 200, height: 40});
  node.relationIds.forEach(rel => {
    g.setEdge(rel, node.id, {});
  });
});
Editing features
And now some editing features. The following 3 is a minimal set:
- Create Node
- Delete Node
- Connect Nodes
All of these are easy on the model side but really tricky if we would like to create good UX.
Creating a node is easy, just add a new Node to our nodes array and regenerate the layout with Dagre.
To delete nodes we need a way to select the nodes then provide a delete button somewhere (toolbar, keyboard shortcut, and/or item in a popup menu).
Node Creation
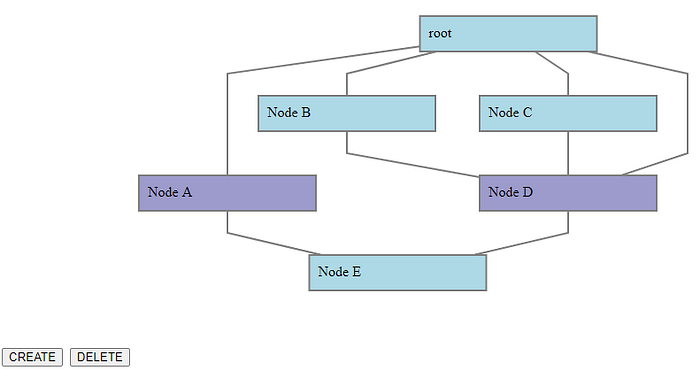
In the RequestLogic workflow editor, the creation is tied to existing nodes. You can create either a child node or a node between two existing nodes. That is the reason we have many create buttons that already specify the location of the newly created node. Here to make it flexible and keep the length of the article below the tl;dr threshold we rely on a single create button:
<button (click)="createNodeClicked()">CREATE</button>---createNodeClicked() {
  this.nodes.push(new Node(this.generateNodeId()));
  this.updateGraph();
}
Here the updateGraph method needs to recreate our boxes and edges arrays with Dagre the same way we did it in the previous article:
updateGraph() {
  var g = new dagre.graphlib.Graph();
  g.setGraph({});
  this.nodes.forEach(node => {
    g.setNode(node.id, { width: 200, height: 40 });
    node.relationIds.forEach(rel => {
      g.setEdge(rel, node.id, { node: node });
    });
  });
  dagre.layout(g);
  this.boxes = [];
  g.nodes().forEach(n => {
    var node = g.node(n);
    var box = new Box (n, node.x - node.width / 2, node.y -  node.height / 2, node.width, node.height, n);
    this.boxes.push(box);
  });
  this.edges = [];
  g.edges().forEach(e => {
    this.edges.push(new Edge(g.edge(e).points));
  });
}
You can implement your own generateNodeId method where the only requirement is to be a node-wide unique string. Here is this little overkill implementation for this particular example:
generateNodeId(): string {
  const prefix = "Node ";
  var latestCode = "A";
  this.nodes.forEach(node => {
    if (node.id.startsWith(prefix)) {
      var code = node.id.substr(prefix.length, node.id.length -   prefix.length);
      if (code > latestCode) {
        latestCode = code;
      }
    }
  });
  if (latestCode.length == 1 && latestCode != 'Z') {
    latestCode = String.fromCharCode(latestCode.charCodeAt(0) + 1);
  } else {
    latestCode = "X" + Math.trunc(Math.random() * 100 / 100);
  }
  return prefix + latestCode;
}
The node will be placed somewhere by Dagre but I am sure you will not like the result. Let continue with the node deletion and get back to node creation later.
Node Deletion
We need a method to delete a node from our nodes array:
removeNode(nodes: Node[], nodeId: string) {
  nodes.forEach(n => {
    var index = n.relationIds.indexOf(nodeId);
    if (index >= 0)
      n.relationIds.splice(index, 1);
  });
  var index = nodes.findIndex(n => n.id == nodeId);
  nodes.splice(index, 1);
}
Somehow we have to call this method with the right nodeId. Let add selection support to our boxes.
export class Box {
  public isSelected: boolean = false;  constructor(
    public id: string,
    public x: number,
    public y: number,
    public width: number,
    public height: number,
    public label: string) {
  }
}
When a box is clicked we need to set this isSelected property to true (or false to toggle it). Here is the simple implementation for the click event of the box:
boxClicked(box: Box) {
  box.isSelected = !box.isSelected;
}
The box display should be improved to call this method and display the box differently if selected:
<g *ngFor="let box of boxes" (click)="boxClicked(box)">
  <rect class="box" [ngClass]="{'selected': box.isSelected}" [attr.x]="box.x" [attr.y]="box.y" [attr.width]="box.width" [attr.height]="box.height" />
  <text [attr.x]="box.x + 10" [attr.y]="box.y + 24">{{ box.label }}</text>
</g>
The ‘selected’ class is added to the rectangle if the box is selected:
.box.selected {
  fill: #45449e88;
}
Now we have selection support, we just need to call the delete on the selected nodes. For now, just add a simple delete button that is enabled if any of the nodes is selected.
<button [disabled]="!hasSelectedNode" (click)="deleteNodeClicked()">DELETE</button>---deleteNodeClicked() {
  this.boxes.forEach(box => {
    if (box.isSelected) {
      this.removeNode(this.nodes, box.id);
    }
  });
  this.updateGraph();
}
Connect Nodes
Now we have node selection support so we can improve the creation process as well. What if we connect the newly created nodes with the selected nodes?
To achieve this simple behaviour we need to update the createNodeClicked method:
getSelectedNodeIds(): string[] {
  return this.boxes.reduce((selectedNodeIds: string[], box: Box) => {
    if (box.isSelected) selectedNodeIds.push(box.id);
      return selectedNodeIds;
    }, []);
}createNodeClicked() {
  var selectedNodeIds = this.getSelectedNodeIds();
  this.nodes.push(new Node(this.generateNodeId(), selectedNodeIds));  this.updateGraph();  this.boxes.forEach(box => {
    box.isSelected = selectedNodeIds.some(x => x == box.id);
  });
}
Summary
Now we nailed the creation and deletion but are not finished with connecting the nodes. The edges are not directed yet however, our model has direction info. Also, different node types, panning, zooming are not even mentioned yet…
